Hot Ends, Extruders
& Carriages
The design of Extruders and HotEnds
is outside the scope of this project, but the printer won't be of much
use without them so we've got to consider the alternatives and have
something ready to mount on the carriage when it comes time to print!
The following links will take you to the suppliers and technical information for each topic area:
Hot Ends - Thermistors
- Extruders
- Bed
Leveling
- Bowden Fittings
Now for the interesting design information.
Hot End Mounts
Part
of mounting a Hot End is how you prepare the wiring. Most Hot Ends come
"naked" - unassembled, basically a box, or bag, of parts. If you've
never put one together then take a look at this article: http://www.soliforum.com/topic/5494/how-i-assemble-naked-hotends/
Once it's assembled, we need a way to mount each 'family' of hot end (right now
either J-Head or E3D). Each hot end also needs a cooling fan. I was
inspired by http://www.thingiverse.com/thing:337311 which combines both
the hot end mount and the fan mount. Finally, I also wanted to be able
to dismount a hot end without having to work from the underside of
the carriage. I hate 'standing on my head' in order to do repairs. In
the material that follows, clicking on the image file will bring up a
3D-pdf file that you can rotate & zoom on, as well as converting
parts to wireframe if you need to see hidden details.
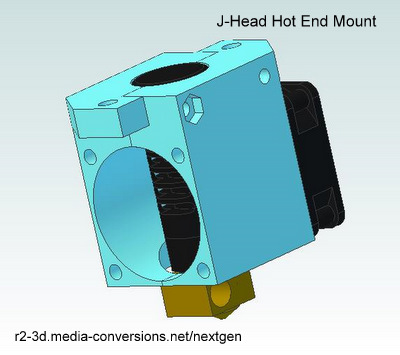 | 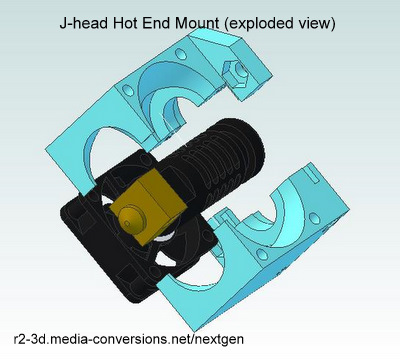 |
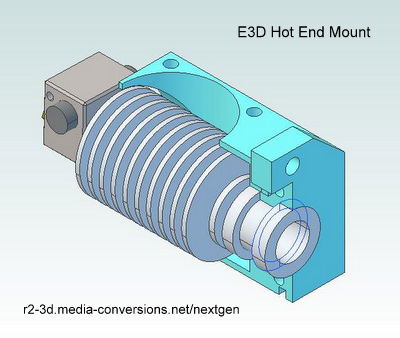 | The mount is a clamshell design with a mounting tab on each side.
The tab engages a slot on the opposite side to add strength to the mount.
The fan mounting holes are in both sides as a consequence of the part symmetry.
I have not tried to compensate for the difference in heights of the two different hot ends.
Like everything else about this design, the hot end mounts are a 'work
in progress'.
See the comments below (after the section on Carriages)
on possible changes. |
Carriages
Hot end mounts don't do you any good unless you have something to mount them
on. Here is the progression of designs to date for the carriages.
For each of the designs below you are looking at the underside of the carriage, so in actual use they will be upside down.
I'm using 12mm rod and mating LM12UU linear bearings
For the carriage design I drew my inspiration from http://www.thingiverse.com/thing:116984 and http://www.thingiverse.com/thing:285851
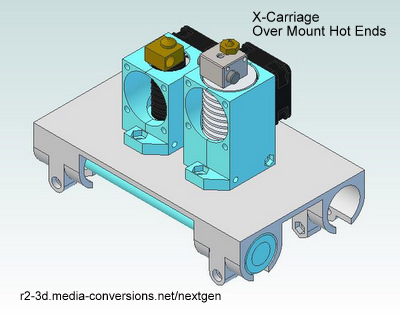
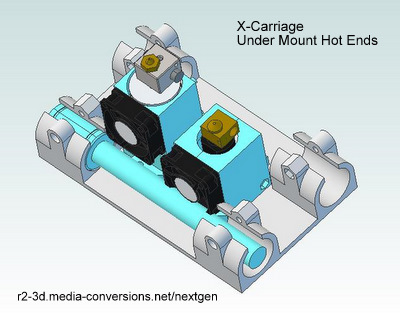 | I started mounting the hot ends between the linear bearings and immediately had clearance problems with the fan on the J-Head.
For
I while I contemplated making the hot end mounts narrower so the fans
would clear (note the E3D mount has it's fan notched in). |
 | Then
it dawned on me that I'd have no clearance problems if I simply
inverted the carriage, installing the hot ends on all of that open
space on what was the 'top'.
Having made that change, I
was then unhappy with the overall size of the carriage. It affects the
length of the rods necessary to get full coverage for both hot ends on
the build platform so the more compact the better.
This carriage is 135mm x 81.4 mm
|
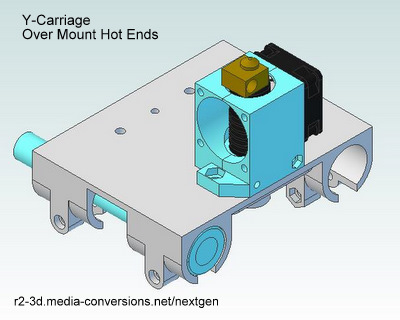 | In
this version of the carriage (I called it Y simply to make it different
from X) I've moved the bearings further apart in one dimension and
closer together in the other.
This carriage is 82mm x
104.8mm. The 82mm dimension could be reduced but I'm holding ~22mm in
the middle for an as yet to be designed Z probe to support automatic
bed leveling. |
What can be done better? What's missing? I've got a long list:
The
bowden adapters are oversize and need to be trimmed slightly so that I
can add ribs to the edges of the carriages to keep the carriage from
bending.
The hot end mounts are different heights so you can't mix
2 different kinds on the carriage. I don't think that's a big issue
right now.
I need GT2 belt anchors with belt tensioning built in. I'm looking at a number of Thingiverse ideas.
I need to design the mating rod end mounts and bearing mounts for the other dimension of the machine.
I'm
hoping to be able to fold the rod ends/mounts to be able to recover
some of the unused Z height but that might be wishful thinking!
I need to have a home sensor mounts (I'm leaning to optical sensors instead of micro switches)
I need to study the requirements for the Z sensor used to auto level the bed and design that to fit in the space available.
If I make the hot end mounts taller I might be able to do away with the mounting ears and put in a recess for a captive nut.
The E3D is already 50mm high and the bearing mounts add an additional ~32 mm in height
so I'd be trading more Z height in the machine for a slightly smaller X/Y footprint. Might not be a good trade.
I
could also go back to the very first carriage and make it slightly
wider to handle the clearance issues with the hot end mounts.
That would mean a bigger X/Y footprint in exchange for less Z height.
So - What have I forgotten?
belt anchors
http://www.thingiverse.com/thing:23882
http://www.thingiverse.com/thing:25208
http://www.thingiverse.com/thing:72563
http://www.thingiverse.com/thing:297726
Hot Ends
J-Head
http://reprap.org/wiki/J_Head_Nozzle
http://mmengring.dyndns.org/ENGR/index.php/J_Head_Nozzle
http://reprap.org/wiki/J_Head_Nozzle#Version_5_2 - download the
engineering drawing
http://reprap.org/wiki/Mounting_plate
E3D
http://e3d-online.com/
assembly instructions - http://e3d-online.com/Documentation
http://forum.e3d-online.com/viewtopic.php?f=7&t=45
http://www.soliwiki.com/E3D_extruder
Hexagon Hotend
http://www.reprapdiscount.com/hotends/67-hexagon-hotend-set.html
$49 - hong kong supplier
Hot End Coolong Fans
A1 J-Head Came with a 40mm fan, E3D comes with a 30mm fan.
Fan size ultimately defines c/c spacing for dual extruder head.
40mm 12v fan - multiple eBay suppliers (china, free ship) less than $1.00
30mm 12v fan from Jamesco - cat 142 pg 87 $3.95/q1 - also available as 5v fan
DC Fan Ball 12 Volt 0.07A 0.1W 8000RPM 4.6CFM 22.5dB Flange Mount
BEF0312MS 30mm x 30mm Brushless Cooling Fan for ESC Motor - Black (DC5V / 0.16A)
http://stores.ebay.com/eshopic
http://www.ebay.com/itm/BEF0312MS-30mm-x-30mm-Brushless-Cooling-Fan-ESC-Motor-Black-DC5V-0-16A-/131255366806?pt=Radio_Control_Parts_Accessories&hash=item1e8f6df496
variety of eBay suppliers, as low as $2.80 - free ship
Hot-End Suppliers
J-Head Mk V-BV
https://www.hotends.com/index.php?route=product/product&product_id=88
j-head 56.99 - mtg plate 7.49
J Head Hot End Kit (hotends.com reseller)
http://www.tridprinting.com/Hot-Ends/
j-head 59.99 - no mtg plate - lower shipping cost makes this one
preferred supplier
J-Head Mk V-BV .35mm Kit for 3mm Filament
http://www.ultibots.com/hot-ends/
j-head 69.95 - only .35mm nozzle (or .5mm)
E3D All Metal Hot End, Direct Extruder
http://store.makerstoolworks.com/extruders-and-parts/e3d-all-metal-hot-end-direct-extruder/
e3d $79.95 .4mm noz 3mm fil 24v heater w/ thermistor, fan & fan
housing
All-metal E3D (v5) Hotend
http://www.filastruder.com/products/all-metal-e3d-hotend
e3d- $79.99 3mm direct feed .4mm noz - no
'choices' (12v heater)
Thermistors
http://reprap.org/wiki/Thermistor
Warning: Not
mentioned in the Wiki - unless i mised it - Thermistors develop stress
cracks with age
and will need to be replaced after about 1 year of use. Symptom -
normally stable system starts overshooting
and undershooting target temp as though it were drunk.
http://reprap.org/wiki/J_Head_Nozzle#Mk_V-B
http://reprap.org/wiki/J_Head_Nozzle#Mk_V-BV
http://reprap.org/wiki/J_Head_Nozzle#Thermistors
mk v-b
Thermistor 1 EPCOS 100K
B57560G104F (Replacement Part
B57550G1104 ?)
http://www.epcos.com/inf/50/db/ntc_09/Glass_enc_Sensors__B57560__G560__G1560.pdf
mk v-bv
Summary: As the old thermistor was discontinued, the Semitec thermistor
was substituted.
Thermistor 5 Semitec
104GT-2
http://www.semitec-usa.com/downloads/gtthermistor.pdf
purchased assembled thermistors from MTW
claimed it was Epoc B57560G104F. - but that's the discontinued part
number?
see also
http://forums.reprap.org/read.php?4,205448,205468
Extruders
http://reprap.org/wiki/Bowden
http://reprap.org/wiki/Erik%27s_Bowden_Extruder
design thought - make printed clamp ot go around tubing fittings
00str00der -
belt-driven, gear-based, open-source extruder design
http://reprap.org/wiki/00str00der
MK8 Extruder Rep2 Mod Rev 2
http://www.thingiverse.com/thing:159393
MK8 Extruder Rep2 Mod
http://www.thingiverse.com/thing:50345/#instructions
MK8 Spring Loaded Upgrade Designed for Stainless Steel Printing
http://www.thingiverse.com/thing:86162
ffleurey 3mm E3D Idler Remix
http://www.thingiverse.com/thing:264024
Mk8 direct-drive extruder for 3mm filament
http://www.thingiverse.com/thing:148358
Direct-drive hinged extruder for E3D/J-Head hot-end (Prusa i3)
http://www.thingiverse.com/thing:147705
Direct Drive Vert-Xtruder
http://www.thingiverse.com/thing:137806
T2 Extruder
http://www.thingiverse.com/thing:158074
Direct drive extruder for 1.75 / 3mm filament, NEMA 17, MK8 gear and
the Prusa hot end mk1
http://www.thingiverse.com/thing:110269
Sparkcube customized for the new E3D-V6
http://www.thingiverse.com/thing:349186/#files
features an adapter for the e3d
NEW
Direct Drive Vert-Xtruder by gyronictonic, published Aug 23, 2013
http://www.thingiverse.com/thing:137806
uses parts from - has interchangable mounts for j-head & e3d
hot ends
QUBD extruder
mod by mickb, published Jan 20, 2013
http://www.thingiverse.com/thing:43411
Mk8 direct-drive extruder for 3mm filament by ffleurey, published Sep
9, 2013
http://www.thingiverse.com/thing:148358
MK8 Extruder Rep2 Mod Rev 2 by builtbybogus, published Oct 2, 2013
(includes step files)
http://www.thingiverse.com/thing:159393
uses spring clip (handle) for tension
Bowden Fittings
Info on Pipe Thread - http://en.wikipedia.org/wiki/National_pipe_thread
for 1/8 in MIP - tap drill in R () , .339 in or 8.61 mm
thing:138015 - Greg's Extruder Bowden Conversion - by rickmellor, published Aug 22, 2013
https://www.thingiverse.com/thing:138015
info on fittings
I think I used these fittings: http://www.usplastic.com/catalog/item.aspx?itemid=23186&catid=832&clickid=partnumber&partnumber=58154
And this tube: http://www.usplastic.com/catalog/item.aspx?itemid=23540&catid=840&clickid=partnumber&partnumber=58053
this refers to a John Guest Super Speedfit Tube Fittings - Acetal NPTF Male Pipe Connectors
fitting referenced is wrong (3/8 tube - but there is a 1/4 fitting on that page)
thing:116984 - Dual Reinforced Prusa X Carriage with .xxx. - by mfuqua, published Jul 13, 2013
http://www.thingiverse.com/thing:116984
instructions - Can use either PL-3004 or LFA-22 fittings for bowden connections.
equivalent available at Home Depot and Lowes
Watts - PL-3004 1/4 In. O.D. Tube X 1/8 In. Male Iron Pipe Adaptor
http://www.homedepot.com/p/Watts-1-4-in-x-1-8-in-Plastic-Quick-Connect-OD-x-MIP-Adaptor-PL-3004/100122781?keyword=Watts+PL-3004#thdHeader
Watts - Model # PL-3004 - Internet # 100122781 - Store SKU # 759247
1/4 in. x 1/8 in. Plastic Quick Connect OD x MIP Adaptor
Watts - Model # PL-3005 - Internet # 100115798 - Store SKU # 778220
Quick Connect 1/4 in. x 1/4 in. Plastic Compression x MPT Adapter
Watts PL-3004 Push Male Adapter, 1/4-Inch OD x 1/8-Inch MIP
http://www.amazon.com/Watts-PL-3004-Adapter-4-Inch-8-Inch/dp/B000DZEQ3E#productDetails
Watts LFA22 Compression Male Adapter, 1/4-Inch C x 1/8-Inch MIP
http://www.amazon.com/Watts-LFA22-Compression-Adapter-4-Inch/dp/B004VT22BQ
SMC KQ2H Push-to-Connect Tube Fitting, Adapter, Brass Body, Tube OD x
Metric (M) Thread Male, With Gasket, Metric
http://www.amazon.com/dp/B00AM41P2Q/ref=biss_dp_sa2
SMC KQ2H07-34A Brass Push-to-Connect Tube Fitting, Adapter, 1/4" Tube OD x 1/8" NPT Male
http://www.amazon.com/dp/B004M8T3C2/ref=biss_dp_t_asn
three in this series
SMC KQ2H Push-to-Connect Tube Fitting, Straight Union, PBT Body, Tube OD, Inch
http://www.amazon.com/gp/product/B00AM41G9S/ref=pe_307530_121731170_em_1p_7_ti
SMC KQ2H07-00A PBT Push-to-Connect Tube Fitting, Straight Union, 1/4" Tube OD
http://www.amazon.com/SMC-KQ2H07-00A-Connect-Fitting-Straight/dp/B004M8T1J2/ref=pd_sim_sbs_indust_1?ie=UTF8&refRID=095EH6TN36E93P8TC8J5
all plastic fitting - if there's any advantage
Legris 3175 56 11 Nickel-Plated Brass Push-to-Connect Fitting, Inline Connector, 1/4" Tube OD x 1/8" NPT Male
http://www.amazon.com/dp/B00835RW6Y/ref=biss_dp_t_asn
Legris 3175 56 14 Nickel-Plated Brass Push-to-Connect Fitting, Inline Connector, 1/4" Tube OD x 1/4" NPT Male
http://www.amazon.com/dp/B00835RWKU/ref=biss_dp_t_asn
20 fittings in the legris line...
Celcon Push-to-Connect Tube Fitting, Acetal Copolymer, Straight Coupler, 1/4" Tube OD
http://www.amazon.com/dp/B000FN1ZSS/ref=biss_dp_t_asn
different line of plastic fitting - 6 in this family
might mate with
3.0 mm ID PTFE Teflon Tube for 3.0 mm Filament RepRap-DIY 3D Printer Parts - 4.5' Piece
3mm id , 5mm od
http://www.amazon.com/Teflon-Filament-RepRap-DIY-Printer-Parts/dp/B00C45455U/ref=pd_sim_sbs_indust_1?ie=UTF8&refRID=1K13H3Q9Q093PQSBW8K3#productDescription
frequently brought with
SMC KQ2H04-M5A Brass Push-to-Connect Tube Fitting, Adapter, 4 mm Tube OD x M5x0.8 Male
http://www.amazon.com/SMC-KQ2H04-M5A-Connect-Fitting-Adapter/dp/B004M8T28M/ref=pd_bxgy_indust_text_y
Bed Leveling
Precision opto probe for auto bed leveling
http://www.thingiverse.com/thing:263180
Auto bed-level for Ultimaker
http://www.thingiverse.com/thing:225584
X-Carriages with front mount for auto bed level
http://www.thingiverse.com/thing:263199
Auto bed-leveling servo mount
http://www.thingiverse.com/thing:209384
Lulzbot TAZ retractable Z-probe auto bed level compensation with G29 Mod
http://www.thingiverse.com/thing:117957
Z-Probe extruder mount for Solidoodle, for auto bed leveling
http://www.thingiverse.com/thing:193786
posted in the MendelMax Digest - Z-Probe Auto Level Tutorial?
Alex <ver2go96@gmail.com> Aug 10 03:35PM -0700
Anybody have a link to how to set one up? I don't even have end stops on my MM currently.
I do have the switches and the servo and associated parts ready.
Mike Morning <mmorning78@gmail.com> Aug 10 06:44PM -0400
Here is some you tube info on it. I believe there are links in the description
Setting up auto bed-leveling on the Makerfarm Prusa i3. Part 1 - Hardware Assembly
http://www.youtube.com/watch?v=awsI9bMndJA&app=desktop
Setting up auto bed-leveling on the Makerfarm Prusa i3. Part 2 - Configuring Marlin
http://www.youtube.com/watch?v=6msLOR_EfKc
Setting up auto bed-leveling on the Makerfarm Prusa i3. Part 3 - Final setup
http://www.youtube.com/watch?v=YpiOsetkIRg
Contact
Information
Contact me using: fpirz (at) media (dash) conversions (dot)
net