Spray Booth Design

Spray Boot Research
A quick Google search turns up a bunch of designs for DIY spray booths as well as a number of commercially available booths.
This is just a short list.

The 7 Best Airbrush Spray Booth Reviews and Buying Guide
Related Posts:
    6 Best Airless Paint Sprayers 2020 Reviews & Buying Guide
    The 5 Best Spray Paint For Plastic Reviews and Buying Guide
    12 Best Airbrush Compressor 2020 Reviews & Buying Guide
    The 7 Best Paint Sprayers Reviews and Buying Guide

Makezine: Build an Easy and Cheap Tabletop Spray Booth
unearthed a ton of builds, most based on the same basic design.

YouTube: How I build a FoamCore Hobby Spray Booth for under $200

Spray Boot Design Goals
After studying the designs above the basic parameters for my design became:
Table top: Designed to fit on top of an existing folding card table. Limits outside dimensions to roughly 30in x 30in.
Lightweight. Have to be able to move it to/from storage in different locations. Rules out particle board designs.
Passing threw doorways without scraping hands limits height. I used 24 in height based on my original cardboard design.
Exhaust fan to control spray mist fallout. Possible to add ducting for external exhaust later on.
Needs to be lighted. Can't depend on room lighting to clearly see the parts being painted inside the booth.
No exotic components. Use readily available, inexpensive, parts and supplies for a reproducible design.
Simple fabrication methods. I almost met this one - for simplicity, the fan mount was CNC fabricated.
Turntable to allow rotating parts being painted without touching them.

Resulting Spray Boot Design

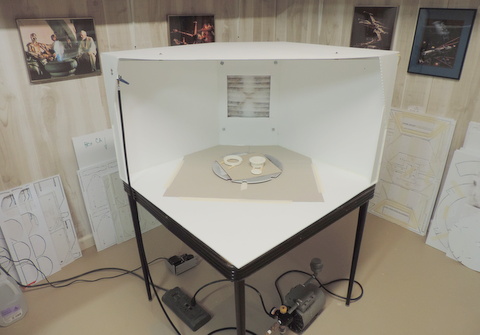
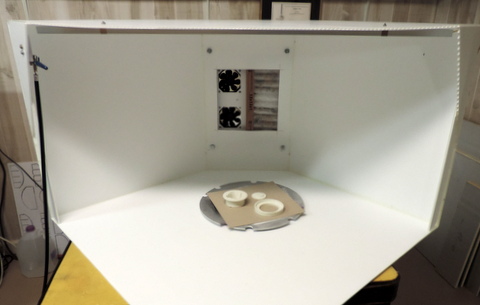
Spray booth on top of card table.


Close up of booth, filter partially slid out to show fan bay.

Left: closeup of fan bay.
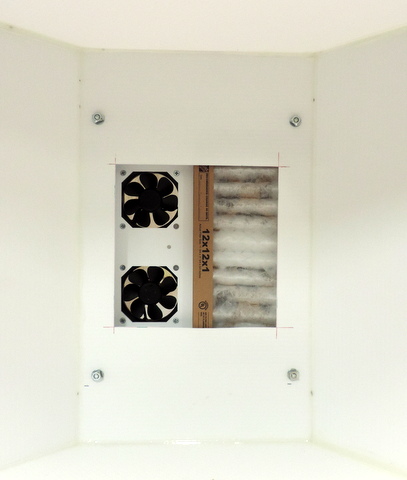
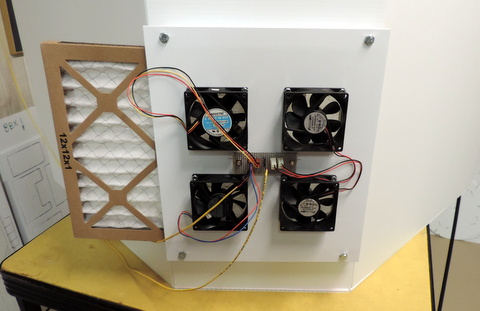
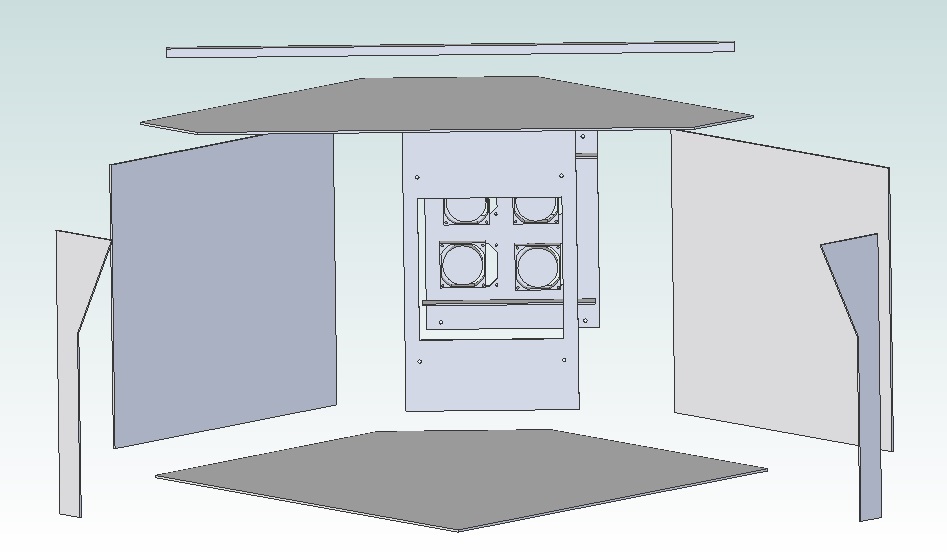
Above: rear of spray booth showing fan bay and filter.

If needed a shroud could be bolted onto the rear of the fan bay to allow feeding the exhaust to a hose and external vent.

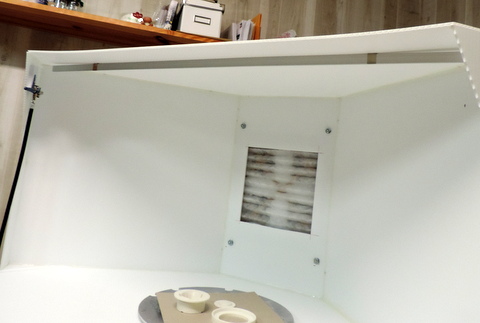
Showing light bar mounted at front of top edge.

Light Bar lit up, brightness tends to wash out other details.

Spray Boot Design - Construction Details

Choice of Material: A number of the articles I referenced above talked about a corrugated plastic material similar to corrugated cardboard. Where I am in NJ, it is available in white, 4ft x 8ft sheets, .157in thick, from both Home Depot (they carry Coroplast Brand) and Lowes (who carries Plaskolite Brand) at a cost of about $20/sheet. If you don't have a pickup truck, or a large Van, you'll need a straight edge and a utility knife to cut it up into smaller pieces at the store. It cut's easily, just make sure you have a new blade in the utility knife. I've provided a cutting diagram (you can download a copy to print out & bring with you to the store).
Remember: Measure twice, cut once!

Cutting Diagram:
There are two sets of drawings for the cutting diagram. The first describes the set of cuts needed to turn the full panel into pieces small enough to fit into your vehicle.

First Set  of Cuts of the Full Sheet


Second Set of Cuts on  60 x 48 Piece
At this point you have 5 pieces of plastic. Two Pieces 30x30, one piece each: 60x18, 48x20 and 48x16.
You should be able to fit these into your vehicle to take home. (Presuming it's easier to work there instead of at the store!)
 

The next set of drawings cuts those into the pieces needed to assemble the booth.


Major Components:
There are a number of components I've illustrated in the pictures in addition to the plastic frame of the booth:
Light Bar: I was originally going to re-use some existing under the counter fluorescent lights but I was not happy with the amount of light that I could get from a  standard 15w fluorescent simply was not bright enough. [I'm old, as you get older you need a brighter level of lighting]. I finally settled on an under counter LED lighting strip from LEDsupply. I chose the R6060-IP20-CW-03, a Non Waterproof, IP20, 60LEDs/M, 3ft length, 12 volt, cool white led strip, and it's matching, angled mounting bracket LO-TRACK-1M.  see: https://www.ledsupply.com/led-strips/non-waterproof-12v-led-strips At 14.4 W/m the light strip will require 1.2 amps @ 12 volts. The Light Bar and mounting track cost $27.50 + shipping.
Exhaust Fan(s): The articles cited above call out a number of different fans. I tend to disassemble technology items, like computers, that I'm throwing away. As a result, I've accumulated a supply of 80mm square, 12volt, exhaust fans. They are common in desktop computers and other electronic devices. The fans can share the same 12 volt power supply that the Light Bar uses. I used 4 of them on the back edge of the spray booth. Mine all came from different suppliers, all used less than .2 amps so the total current draw for the set of 4 will be less than .8 amps. You can find this type of fan available from suppliers like DigiKey for as little as $1.50 each.
Power Supply: for Light & Fans: I had an open frame (that means exposed wiring!) 12volt power supply that could produce 3.4 amps. More than enough for the Light bar (1.2 amps) and the Fans (.8 anps) together. Led Supply sells a 35watt 12 volt power supply for about $12 (combine shipping with the light bar!). Other internet suppliers offer similar units for $6 + shipping.
Adhesive: There are a number of ways to hold together the corrugated plastic panels. While Cyanoacrylate (Crazy Glue) works on a surface to surface bond it has poor adhesion bonding cut edge to surface. [I tried it :-( ]. I wound up using GE Clear 100% silicone caulk. As advertised, it sticks to anything, so you have to be careful when applying it. See my notes in assembly below. While it comes in small tubes (2.8 oz ~$4) I found it easier to apply from a caulking gun and used almost a full 10.1 oz cartridge (~$7 for the caulk, ~$8 for a gun if you need one) for the complete assembly!
Miscellaneous: you are going to have an Air Compressor and the Power Supply for the lights & fans. Consider adding a switched outlet strip so you can conveniently turn them on & off. Alternatively, add in-line switches to their power cords.

Assembly:


Finishing
If you are not familiar with finishing/painting 3D Printed Parts see the following youtube.com video tutorials posted by MakerBot:
Finishing 3D Prints 101: How to Glue 3D Printed Parts Together
Finishing 3D Prints 101: How to Sand 3D Printed Parts
Finishing 3D Prints 101: How to Paint 3D Printed Parts
Other interesting tutorials you might find useful include:
if you think filler/primer alone will cure all of your problems see: Filler Primer - Will it make 3D Print finishing easier?
and Learning to Airbrush 3D Prints


Home